
★企業と人材のマッチングサービスを準備中です。アンケートのご協力をお願いいたします!↓

最終更新日:2020/08/12
はじめまして。メーカーで画像認識関連のソフト開発をしている、Y.OKAMOTOです。現場で働くかたわら、最新の技術を人々に届けることに関心を持ち、AIの論文を解説することにしました。
今回から、コードの解説をふまえた技術紹介を4回に分けて行っていきます。今回の連載では、物体を検出する技術に着目します。 企業や医療機関でコンピュータによる物体認識を扱っていきたい技術者や、技術を理解したい方々におすすめの連載です。
AIDBの全記事が読み放題のプレミアム会員登録はこちらから↓
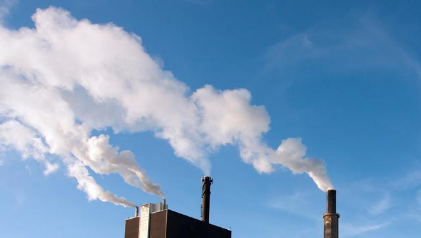
物体検出の技術は、医療や産業ロボットにおける重要な技術です。たとえば医療ロボットの性能は、カメラ映像内に映し出される器具の部位や手術の処置部など各々の認識能力によって左右されます。こうしたロボットの進化は、医師の負担軽減、未知のウイルスからの感染予防、大気汚染軽減などに貢献することが期待されます。
第1回目は、アメリカ・カーネギーメロン大学のYen-Chia Hsuらが発表している、産業に伴う排出煙の認識モデルについて、前編・後編に分けて解説します。
排出煙の認識モデルとデータセットの提案
論文概要


産業に伴う煙の排出は、人々の健康に重大な懸念をもたらします。これまでの研究により、コンピュータービジョン(CV)を使用して煙を可視化することで、環境に対する提議や市民の権限に影響を与えることを可能にしています。
しかしながら、既存のデータセットは、大気質であることを示すCVモデルをトレーニングするためには品質や数量が不十分です。そこでYen-Chia Hsuらは、産業による煙の排出を認識するための大容量ビデオデータセット、RISEを紹介しています。
論文情報
タイトル:RISE Video Dataset: Recognizing Industrial Smoke Emissions
提出日:2020年5月13日
著者:Yen-Chia Hsu, Ting-Hao ‘Kenneth’ Huang, Ting-Yao Hu, Paul Dille, Sean Prendi, Ryan Hoffman, Anastasia Tsuhlares, Randy Sargent, Illah Nourbakhsh
DOI:arXiv:2005.06111
Yen-Chia Hsuらが報告しているデータセットには、3つの異なる産業施設を監視するそれぞれのカメラから得られた、19の異なるカメラビューを持った12,567枚のクリップが含まれています。クリップは、昼間の2年間で春夏秋冬4シーズンに渡る計30日間のものになります。
このデータセットを利用して、ビデオアクション認識用に開発されたディープニューラルネットワークを用いて実験し、性能指標を確立および煙認識の課題を明らかにしています。
それでは、実際にこの技術の使用を試みる方のために、動作環境から順に解説していきます!
動作環境
排出煙認識モデルの動作環境は、以下の通りです。
- Ubuntu 18.04
- CUDA 10.1
- cuDNN 7.6.0
[Package]
- Python 3.7
- pip 2.22.0
- opencv-python 4.1.1.26
- opencv-contrib-python 4.1.1.26
- matplotlib 3.1.1
- scikit-learn 0.21.3
- tb-nightly 2.1.0a20191103
- TensorFlow 2.0.0
- future 0.18.2
- moviepy 1.0.1
- pandas 0.25.3
- torchviz 0.0.1
- torchsummary 1.5.1
ベースモデル「Inflated 3D ConvNet(I3DC)」
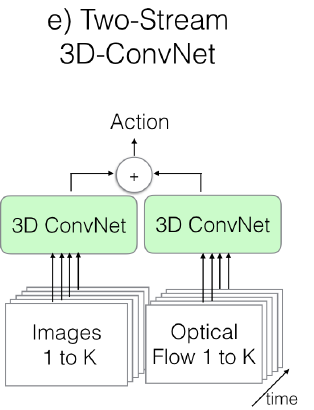
煙を認識を行うためにベースとなるモデルは、Two-Stream Inflated 3D ConvNet(I3DC)を使用しています。 これはJoao Carreiraらが2017年に発表した論文で使用している手法です。
I3DCは、例えば、人間の一定の動作(手に取る、モノを置く、手を洗うなど)のような動きを推論するネットワークです。動作の認識なので、時系列での依存関係を学習します。
I3DC は、Fig.1に示すようにRGBデータとオプティカルフローデータを相互に 3DConvNetで学習していきます。
Inflated 3D ConvNet(I3DC)がどのようなネットワーク構造なのか、コードと共に解説していきます。
I3DCの構造とコード解説
I3DCは、 Joao Carreiraらの論文よるとFig.2のようなネットワーク構造をしています。
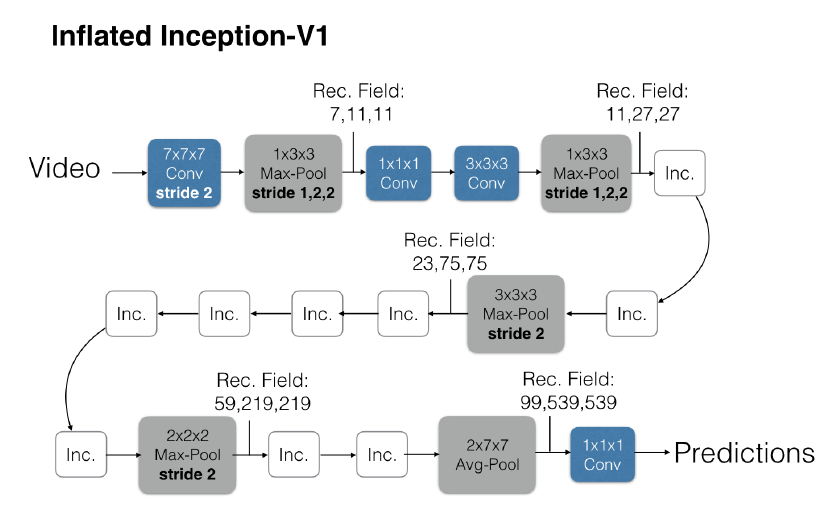
I3DCは、4つのMaxPool3dと1つのAvePoolを持っています。各Pooling層ごとに区切ると、5つフェーズに分けられます。
フェーズI
まず、3channel×36frames×224pixel×224pixelを入力として、フィルタサイズ:64×7×7×7を出力とする3DConvNetを行っています。3DConvNetの出力に対して、フィルタサイズ:1×3×3を出力とする MaxPool3dを行います。
コードで記述すると下記の通りです。
self.end_points = {}
end_point = 'Conv3d_la_7x7'
self.end_points[end_point] = Unit3D(in_channels=in_channels,
                             output_channels=64, kernel_shape=[7, 7, 7],
                             stride=(2, 2, 2), padding=(3,3,3),
                             name=name+end_point)
if self._final_endpoint == end_point: return

end_point = "MaxPool3d_2a_3x3'
self.end_points[end_point] = MaxPool3dSamePadding(kernel_size=[1, 3, 3),
                             stride=(1, 2, 2),padding=0)

if self._final_endpoint == end_point: return
3DConvNetを行う際は、stride=(2,2,2), padding=(3,3,3)で行います。MaxPool3d は、stride=(1,2,2), padding=0です。
なお各層のネットワーク構築は、フェーズVの最後のbuild()モジュールで実施しています。
フェーズⅡ
フェーズIのMaxPool3dの出力を入力として、フィルタサイズ:64×1×1×1を出力とする3DConvNet 、続けてフィルタサイズ:192×3×3×3出力の3DConvNet を行います。その後に、フェーズI同様にフィルタサイズ:1×3×3を出力とするMaxPool3dを行います。
コードで記述すると下記の通りです。
end_point = 'Conv3d_2b_1x1'
self.end_points[end_point] = Unit3D(in_channels=64, output_channels=64,
                             kernel_shape=[1, 1, 1], padding=0,
                             name=name+end_point)
if self._final_endpoint == end_point: return

end_point = 'Conv3d_2c_3x3’
self.end_points[end_point] = Unit3D(in_channels=64, output_channels=192,
                             kernel_shape=[3, 3, 3], padding=1,
                             name=name+end_point)
if self._final_endpoint == end_point: return

end_point = 'MaxPool3d_3a_3x3’
self.end_points[end_point] = MaxPool3dSamePadding(kernel_size=[1, 3, 3],
                             stride=(1, 2, 2), padding=0)
if self._final_endpoint == end_point: return
フェーズⅡは、 channel数を64から192へと層を増やしています。
フェーズⅢ
フェーズⅢでは、フェーズⅡの MaxPool3d の出力を入力として、Inception module(後述)と呼ばれるサブネットワークに処理を掛けます。Inception module を2層続けて行い、その後にフィルタサイズ:3×3×3を出力とする MaxPool3d を行います。
コードで記述すると下記の通りです。
end_point = 'Mixed_3b'
self.end_points[end_point] = InceptionModule(192, [64,96,128,16,32,32],
                             name+end_point)
if self._final_endpoint == end_point: return

end_point = 'Mixed_3c'
self.end_points[end_point] = InceptionModule(256, [128,128,192,32,96,64],
                             name+end_point)
if self._final_endpoint == end_point: return

end_point = "MaxPool3d_4a_3x3’
self.end_points[end_point] = MaxPool3dSamePadding(kernel_size=[3, 3, 3],
                             stride=(2, 2, 2), padding=0)
if self._final_endpoint == end_point: return
Inceptionモジュールでは、モジュール内で 3DConvNet を行うために、入出力channel数を引数として渡す必要があります。Inception module (Inc)は下記のようなネットワーク構造をしています。
Incモジュールのネットワークは、フィルタサイズ:1×1×1出力および、3×3 ×3出力の 3DConvNetを組み合わせた全4パターンの特徴量を算出し、最後にそれぞれを連結して次の層へ渡しています。
コードで記述すると下記の通りです。
class InceptionModule(nn.Module):
    def __init__(self, in_channels, out_channels, name):
        super(InceptionModule, self). __init__()

        self.b0 = Unit3D(in_channels=in_channels,
                  output_channels=out_channels[0], kernel_shape=[1, 1, 1],
                  padding=0, name=name+'/Branch_0/Conv3d_0a_1x1')
        self.b1a = Unit3D(in_channels=in_channels,
                   output_channels=out_channels[1], kernel_shape=[1, 1, 1],
                   padding=0, name=name+'/Branch_1/Conv3d_0a_1x1')
        self.b1b = Unit3D(in_channels=out_channels[1],
                   output_channels=out_channels[2], kernel_shape=[3, 3, 3],
                   name=name+'/Branch_1/Conv3d_0b_3x3')
        self.b2a = Unit3D(in_channels=in_channels,
                   output_channels=out_channels[3], kernel_shape=[1, 1, 1],
                   padding=0, name=name+'/Branch_2/Conv3d_0a_1x1')
        self.b2b = Unit3D(in_channels=out_channels[3],
                   output_channels=out_channels[4], kernel_shape=[3, 3, 3],
                   name=name+'/Branch_2/Conv3d_0b_3x3')
        self.b3a = MaxPool3dSamePadding(kernel_size=[3, 3, 3],
                   stride=(1, 1, 1), padding=0)
        self.b3b = Unit3D(in_channels=in_channels,
                   output_channels=out_channels[5], kernel_shape=[1, 1, 1],
                   padding=0, name=name+'/Branch_3/Conv3d_0b_1x1')
        self.name = name

    def forward(self, x):
        b0 = self.b0(x)
        b1 = self.b1b(self.b1a(x))
        b2 = self.b2b(self.b2a(x))
        b3 = self.b3b(self.b3a(x))
        return torch.cat([b0,b1,b2,b3], dim=1)
Unit3D関数内では、Conv3dを実施した後にバッチノーマライゼーションを行っています。
フェーズⅣ
フェーズⅣでは、フェーズⅢのMaxPool3dの出力を入力として、前フェーズで使用したIncモジュールを5層続けて行い、その後にフィルタサイズ:2×2×2を出力とするMaxPool3dを行います。
コードで記述すると下記の通りです。
end_point = 'Mixed_4b'
self.end_points[end_point] = InceptionModule(128+192+96+64,
                             [192,96,208,16,48,64], name+end_point)
if self._final_endpoint == end_point: return

end_point = 'Mixed_4c'
self.end_points[end_point] = InceptionModule(192+208+48+64,
                             [160,112,224,24,64,64], name+end_point)
if self._final_endpoint == end_point: return

end_point = 'Mixed_4d’
self.end_points[end_point] = InceptionModule(160+224+64+64,
                             [128,128,256,24,64,64], name+end_point)
if self._final_endpoint == end_point: return

end_point = 'Mixed_4e'
self.end_points[end_point] = InceptionModule(128+256+64+64,
                             [112,144,288,32,64,64], name+end_point)
if self._final_endpoint == end_point: return

end_point = 'Mixed_4f'
self.end_points[end_point] = InceptionModule(112+288+64+64,
                             [256,160,320,32,128,128], name+end_point)
if self._final_endpoint == end_point: return

end_point = "MaxPool3d_5a_2x2'
self.end_points[end_point] = MaxPool3dSamePadding(kernel_size=(2, 2, 2),
                             stride=(2, 2, 2), padding=0)
if self._final_endpoint == end_point: return
InceptionModule関数は、出力channelを次層の入力channelとして渡すように記述していきます。MaxPool3dは、フィルタサイズ:2×2×2出力となっており、これまでのフェーズと比べても規模を縮小しています。
フェーズⅤ
フェーズⅤでは、フェーズⅣのMaxPool3dの出力を入力として、Incモジュールを2層続けて行い、その後にフィルタサイズ:2×7×7を出力とするAvePool3dを行います。最後に、フィルタサイズ:1×1×1出力の3DConvNetを行い、その算出値が推論結果となります。
コードで記述すると下記の通りです。
end_point = 'Mixed_5b’
self.end_points[end_point] = InceptionModule(256+320+128+128,
                             [256,160,320,32,128,128], name+end_point)
if self._final_endpoint == end_point: return

end_point = 'Mixed_5c'
self.end_points[end_point] = InceptionModule(256+320+128+128,
                             (384,192,384,48,128,128], name+end_point)
if self._final_endpoint == end_point: return

end_point = 'Logits'
self.avg_pool = nn. AvgPool3d(kernel_size=(2, 7, 7], stride=(1, 1, 1))
self.dropout = nn.Dropout(dropout_keep_prob)
self.logits = Unit3D(in_channels=384+384+128+128,
               output_channels=self._num_classes,
               kernel_shape=[1, 1, 1], padding=0, activation_fn=None,
               use_batch_norm=False, use_bias=True, name='logits')
self.build()
フェーズⅤのPoolingはMaxPool3dではなくAvgPool3dを使用しています。 また、Fig.2のフロー図では省略されていますが、AvgPool3dの後に dropout_keep_prob :0.5でDropoutを行っています。 最後にbuild()モジュールは、add_module()で、各層のニューロンを渡し、ネットワークを構築していきます。
コードで記述すると下記の通りです。
def build(self):
    for k in self.end_points.keys():
        self.add_module(k, self.end_points[k])
以上がベースモデルであるInflated 3D ConvNet(I3DC)のネットワーク構造です。
Yen-Chia HsuらはI3DCをベースモデルとした5つのモデルで評価を行っています。その中でもRGB-I3D-TCというモデルが最良のモデルであったと報告しています。
後編では、RGB-I3D-TCについて説明します!お楽しみに!
■サポートのお願い
AIDBを便利だと思っていただけた方に、任意の金額でサポートしていただけますと幸いです。


 PAGE TOP